nakama
Overview & User Manual
The controller is divided into several parts, called Areas. These are 1) PADs Area, 2) GRID Area and 3) CONTROLs Area. There is also a separated panel dedicated to the application settings. You can access these areas using the top bar buttons. The active one will be highlighted. Pressing the three-dots button will hide/show the bar.
PADs Area
This area is made up 16 big buttons called PADs. They are arranged in 4 rows of 4 columns. Each PAD sends either a pair of Note-On (on press) and Note-Off (on release) messages, or a single Control Change (CC, on release), depending on the current configuration. By default, they will send Note-On/Off messages, but you can change it using the CC button.
PADs are numbered from left to right, from bottom to top, starting at index 1 (bottom left PAD) up to index 16 (top right PAD). The range of notes sent is also configurable. By default, it starts on note 60 (C4 or ‘middle C’) up to 75 (also for CC numbers). You can see the current “root note” as a number, in the right side.
The velocity (or the CC value) is fixed, since a touchscreen is usually not pressure sensitive, sending the value of the PAD. This value is defined in settings, but can be modified for each PAD. To do so, press the button VEL once, to activate the Velocity mode, where you can see all current velocities. To change a value, press and drag horizontally that PAD. Once finished, press VEL again. The new PAD velocity will be stored in your current profile. If a PAD does not have a custom velocity, it will use the default value (as given in settings). If you want to remove all custom velocities, while Velocity mode is active, press SHIFT and then VEL.
Regarding the channels for this Area, there are two defined: Channel A (which by default is 0) is the channel used for events sent by the PADs. Channel B (default 1) is used by the auxiliary buttons (like SHIFT or transpose controls).
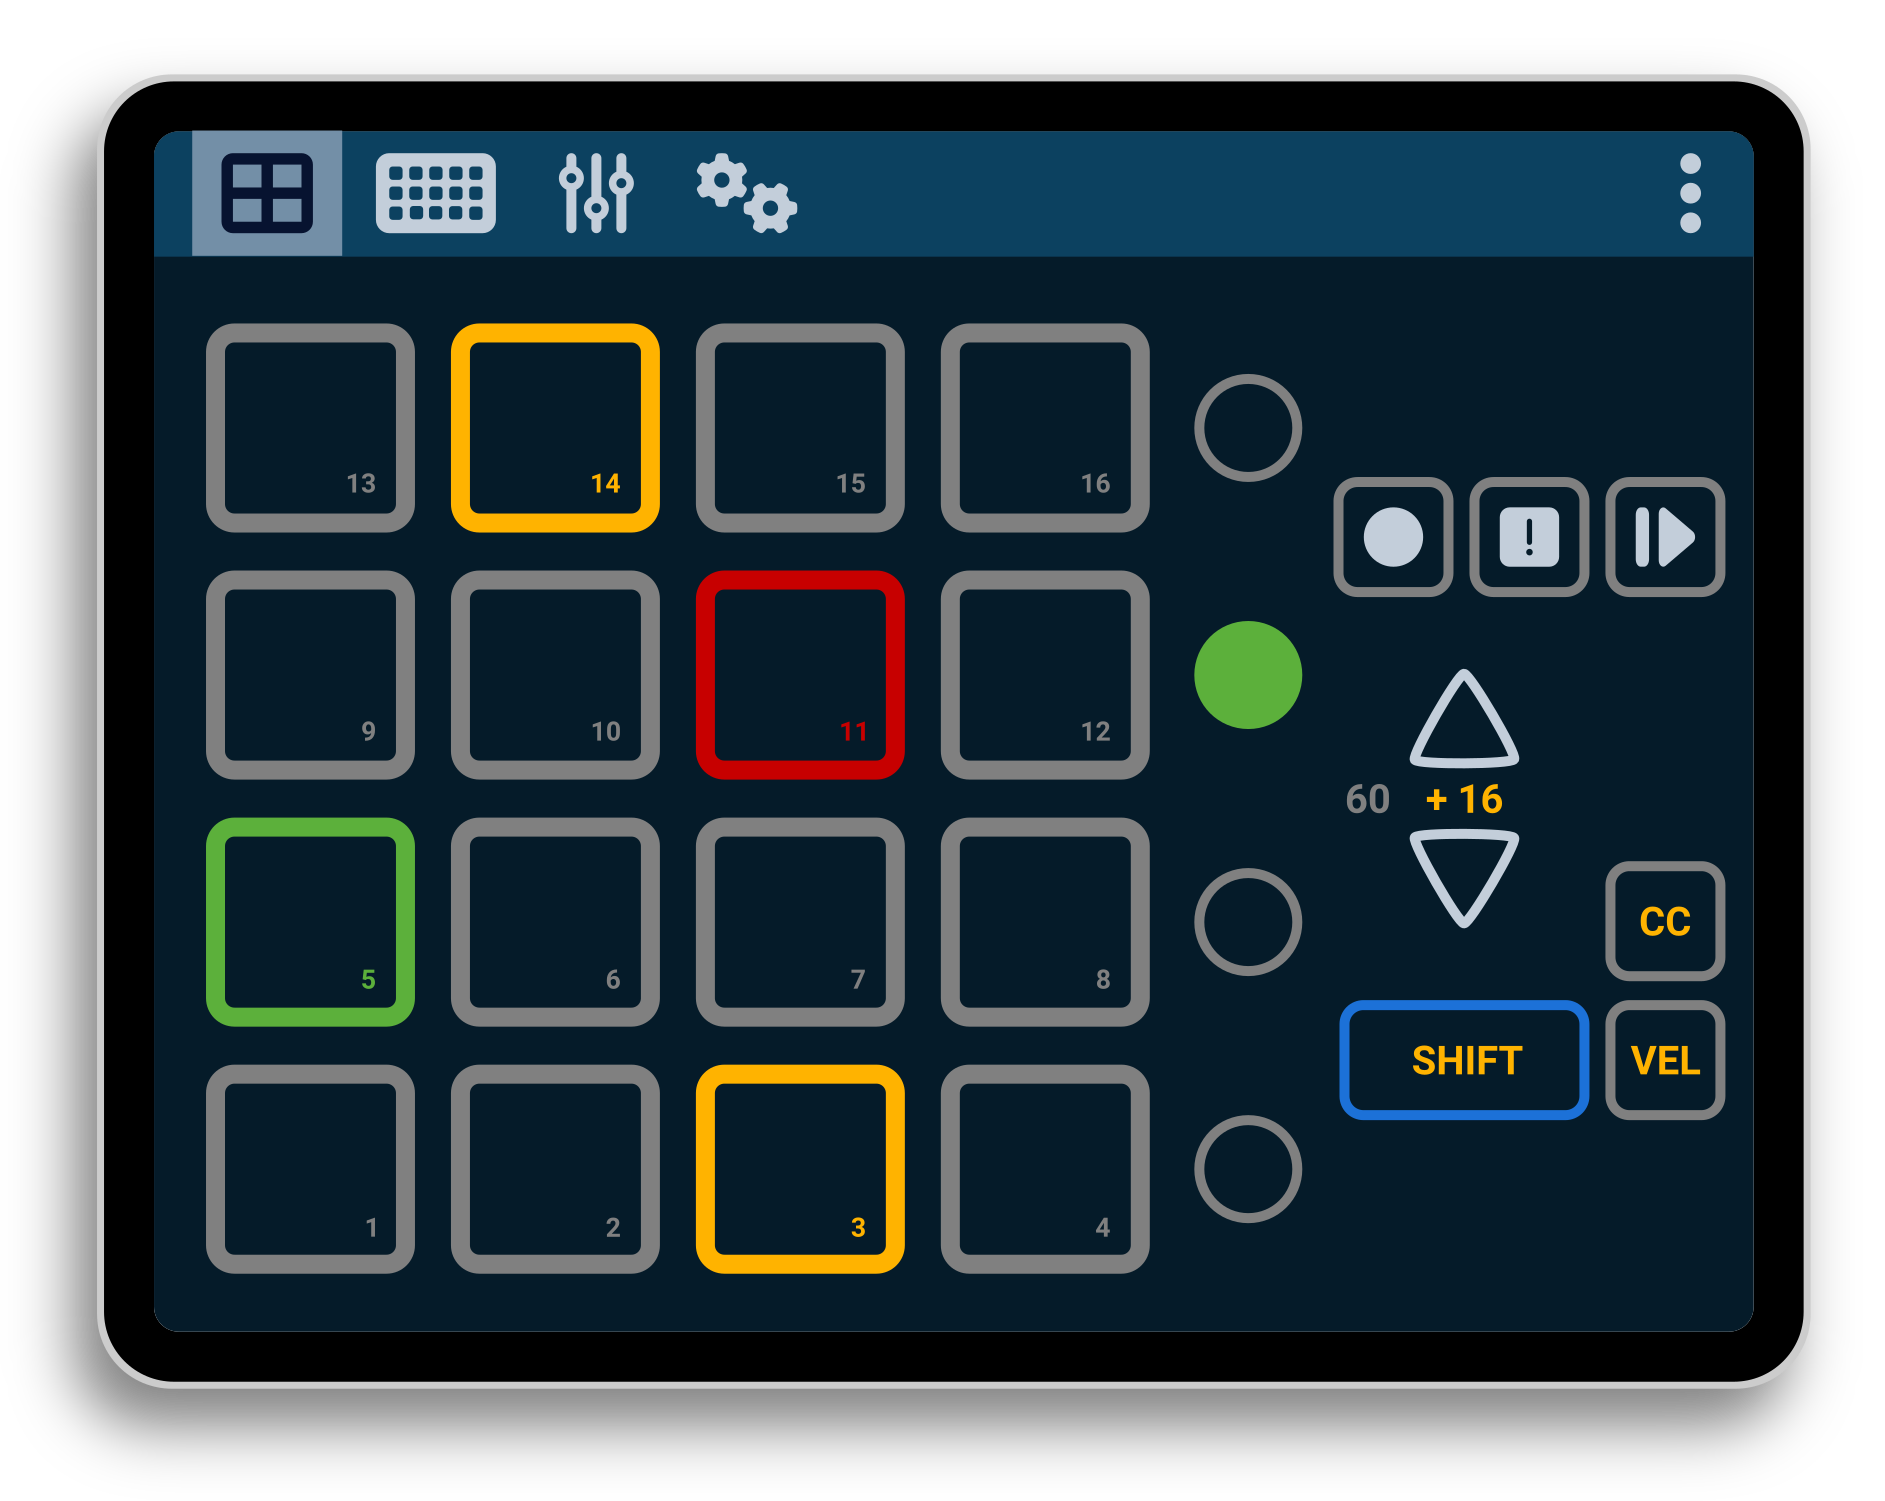
There is also three transpose buttons: record, stop and play/pause. They send CC messages on release event, according to their mapping. To adjust the range of notes sent by the PADs, you can use the up/down buttons. The current offset is shown between both buttons, and express the amount of notes that will be added to the “root note”, which is the used by the first PAD. For instance, a +16 will indicate that the PAD 1 will send the “root note” + 16.
The SHIFT button is latched, which means that when pressed, it will keep that state until next button is pressed. Thus, to send the combination SHIFT + play, you need to press (and release) SHIFT, which will be kept as pressed, and then press (and release) the play button. You can, also, do this combination at once, without releasing the SHIFT button. You can also lock the SHIFT by doing a double-tap. And, to clear an active SHIFT button, press it again. On press, it will send a CC message (using the assigned CC number, and the default velocity as CC value). On release, it will send another CC message, with the value set to zero.
Near each row of PADs there is another button that will send CC messages (acording to its own configuration). These are the row LAUNCH buttons, and can be used to control or select all PADs of a row, or for custom functions.
Buttons state
Some buttons on this area (namely, the PADs, row LAUNCH and transpose buttons) can be controlled with incoming messages on Channel A. First 16 notes (0-15) are for the PADs, notes from 16 to 19 are the row LAUNCH buttons, and then goes rec (20), stop (21) and play/pause (22). A Note-On message is used to change its color, taking the velocity as the index for a color mapping (which you can change in the settings area). A CC message will change some effects of the button, depending on the given value. And a Note-Of message will reset the color to its default state, and remove any applied effect.
The value used for the effect has the following format: the left four bits (only 3 are used, from 0 to 7) indicates the effect, and the remaining bits (16 values) are the amount of the effect to be applied. The available effects are given in the following table:
| Effect Code | Effect Name | Description | Parameter |
|---|---|---|---|
| 0 | Solid | The button remains solid with no effects | None |
| 1 | Blinking | The button blinks on and off | Speed of blinking |
| 2 | Glowing | The button glows in and out | Speed of glowing |
And the range of speed values, from 2000 ms to 50 ms, is as follows:
| Index | Speed (ms) | Index | Speed (ms) | Index | Speed (ms) | Index | Speed (ms) |
|---|---|---|---|---|---|---|---|
| 0 | 2000 | 4 | 1500 | 8 | 1000 | C | 500 |
| 1 | 1875 | 5 | 1375 | 9 | 875 | D | 375 |
| 2 | 1750 | 6 | 1250 | A | 750 | E | 250 |
| 3 | 1625 | 7 | 1125 | B | 625 | F | 125 |
For example, sending a CC message with 0x1A as value, instructs the button to blink at 750 ms (the cycle will be 750 ms, so half of the time will be on, and the other half will be off).
GRID Area
CONTROLs Area
SETTINGS Area
This area is dedicated to setting up the whole application. It has several sections: 1) General, 2) MIDI, 3) PADs, 4) GRID, 5) CONTROLs and 6) Help.
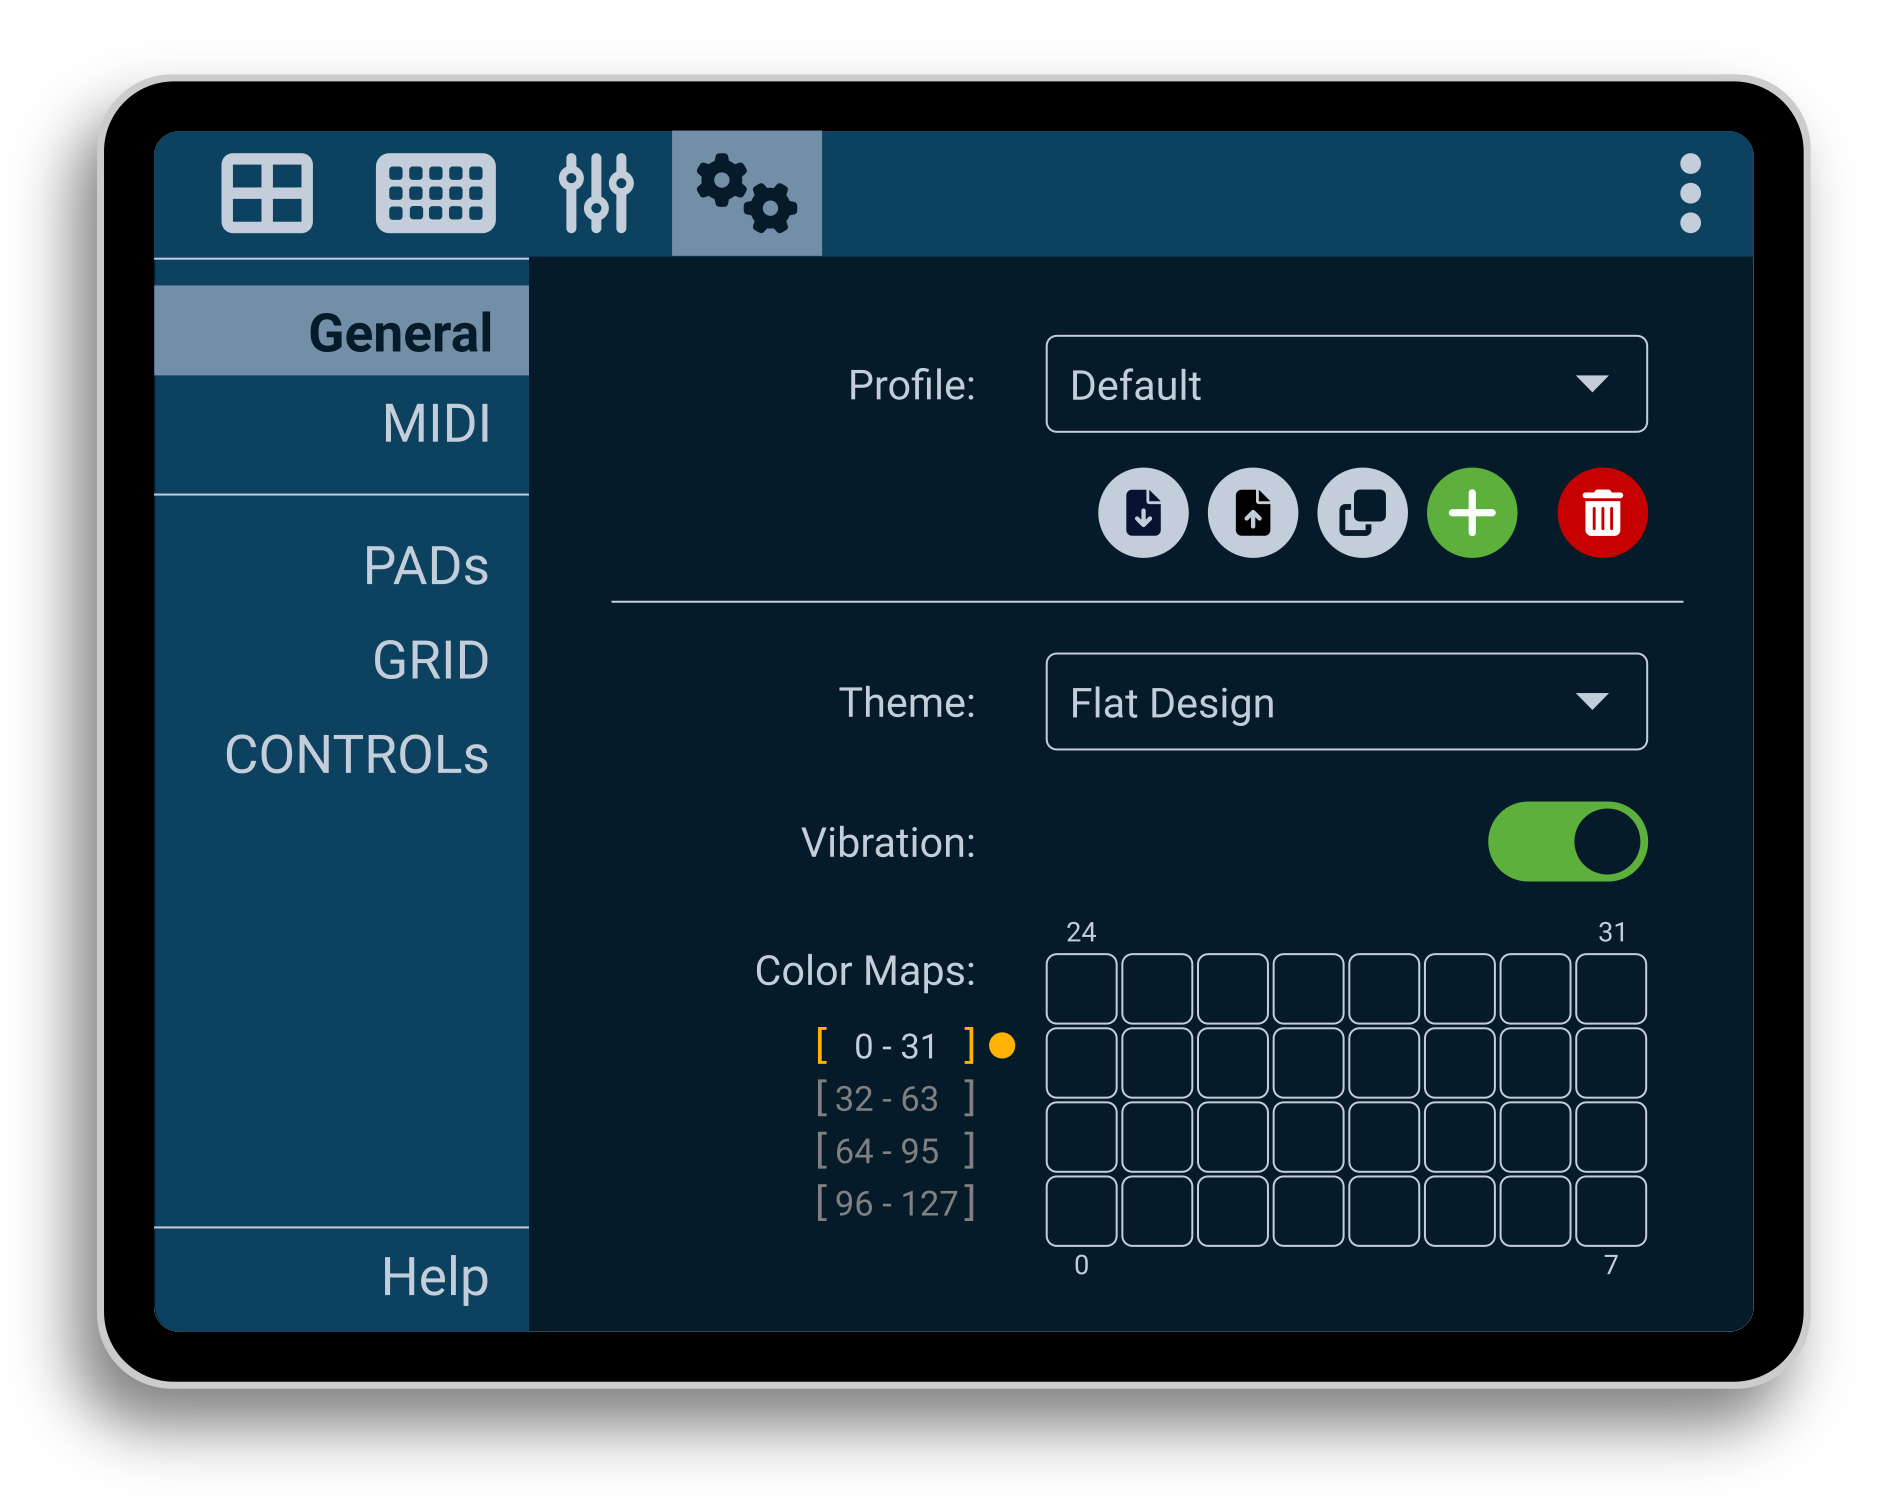
In the General section, you can control the global aspects of the application. The first thing to note is the profile used. Each profile will hold all the customized settings. You can rename, create, clone, export/import and delete your own profiles. Besides, here you can also change the theme, and the color mapping, used for the status feedback received from other MIDI devices. In addition, you can enable/disable the haptic feedback (vibration).
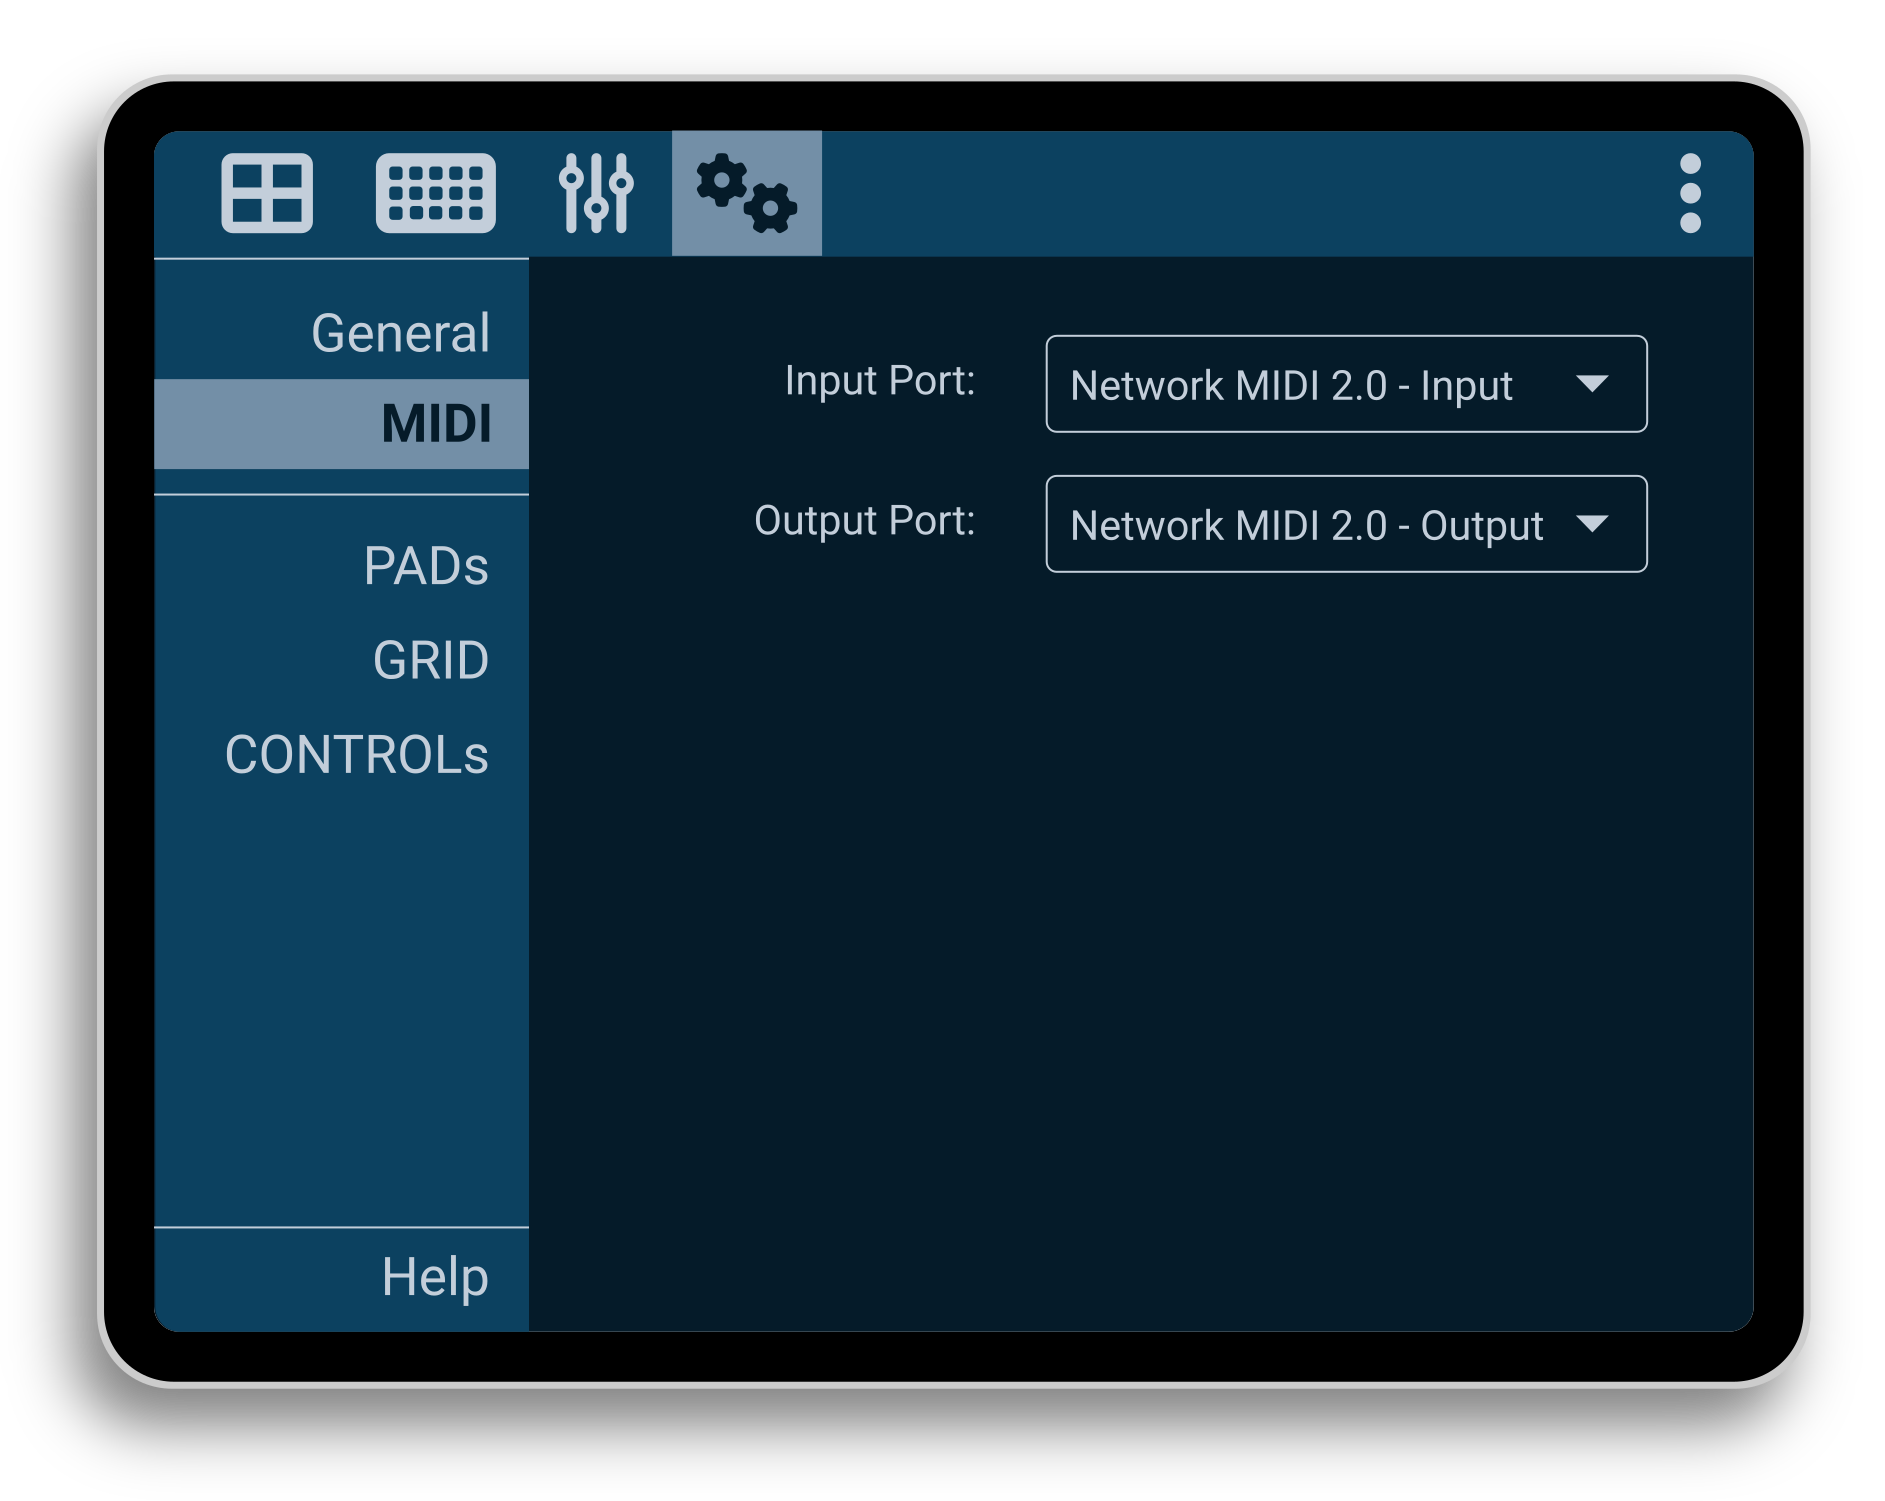
The MIDI section is used to setup global MIDI settings. In particular, the input and output ports to/from which connect.
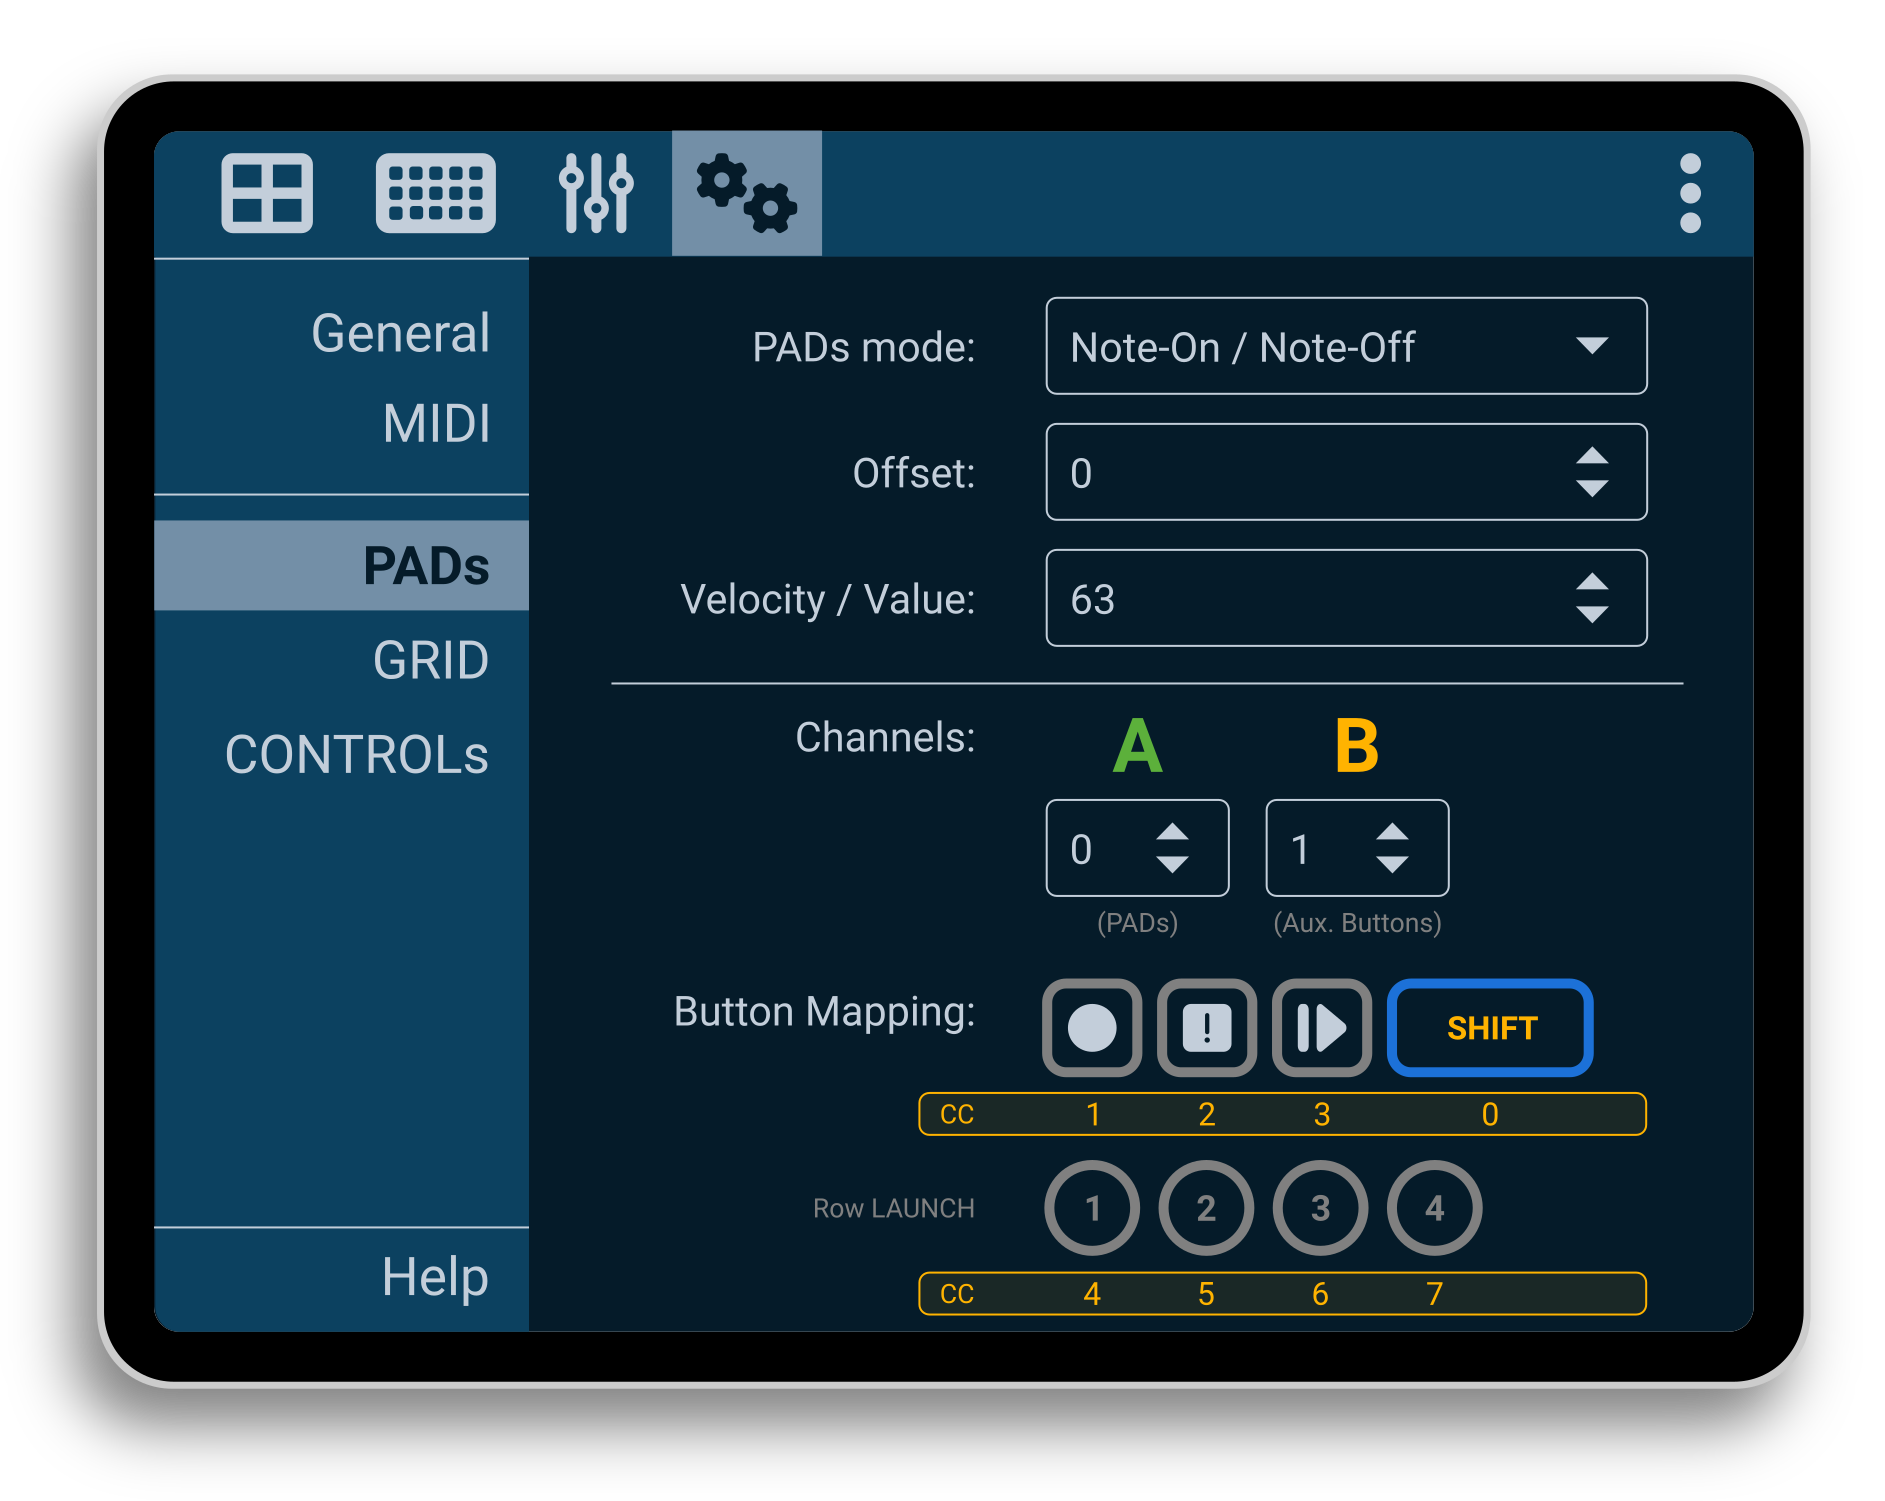
The settings for the PADs Area are adjusted in the PADs section. Here, you can set the default operation mode for the PADs: send Note-On/Off events or a single CC event. The root note property is used to indicate the note or CC number that will be send by the PAD 1; valid values are in the range [0, 112]. The velocity is the default velocity (or value) sent by the PADs. Regarding MIDI channels, here you can set both Channel A and Channel B. Also, in this section you can modify the CC event numbers that will be sent by the auxiliary buttons (transpose controls, SHIFT and LAUNCH buttons).
The GRID section…
Pending to be written
The CONTROLs section…
Pending to be written
The Help section contains useful links, such as this manual, the Zynthian forums, and the GitHub repository. There is also a link to an Android application that can be used as a bridge between MIDI 1.0 and Network MIDI (using UMP). Additionally, users can view and download the app logs, and there is a button to restart the application.